
bluebay2014 - Fotolia
How to connect Power BI with SharePoint
Here's a step-by-step guide on how to connect Power BI with SharePoint team sites without uploading files, allowing you to export and analyze data much more seamlessly.

Power BI is Microsoft's data analytics technology that allows organizations to query and analyze data from multiple sources. Although Power BI and SharePoint can greatly benefit from one another's capabilities, it's not always easy to connect Power BI with SharePoint.
Until quite recently, an organization that wanted to analyze data stored within a SharePoint team site had to upload that data to Power BI. Doing so could be problematic when it came to large data files, and it raised questions about the potential for data exposure.
One of the major improvements from Microsoft is to use a URL to link Power BI to a SharePoint team site without having to upload data files. The process is even easier by allowing linking to a SharePoint team site without requiring the Pro version of Power BI.
Within the Power BI interface, clicking on the Get Data button in the lower left-hand corner of the screen will take you to Power BI's Get Data screen, which you can see in figure one.
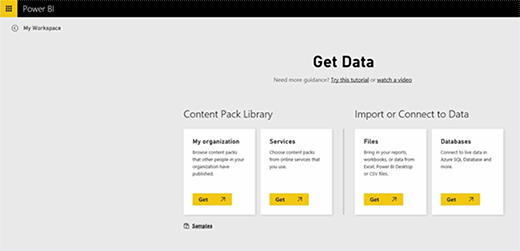
As shown in figure one, none of the data sources specifically mention SharePoint. The reason for this is that Power BI doesn't really analyze SharePoint data, but rather Excel spreadsheet data that is stored within a SharePoint document library. Clicking on the Get button located within the Files section will connect you to a SharePoint team site.
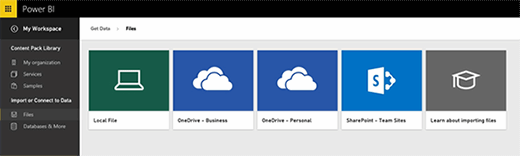
Power BI then asks you to specify the location of the file data needed. As you can see in figure two, Power BI can work with local files, files stored on OneDrive for Business or personal OneDrive, or a SharePoint team site.
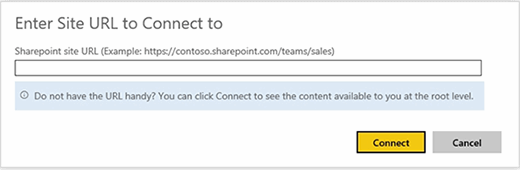
Upon selecting the SharePoint Team Site option, you will be prompted to enter the site URL of the team site to connect to. Microsoft has taken steps to streamline the process. If you don't know the URL, simply clicking the Connect button will bring up any root level content that Power BI is able to locate, as shown in figure three.
If you simply click Connect without entering anything, Power BI will display all the document libraries that it can find. This process works well for document libraries in SharePoint Online. If, however, you use an on-premises SharePoint deployment, then there is a good chance a URL is necessary as a way of helping Power BI locate your document libraries. It may also be helpful to go ahead and enter a URL if you have a large collection of team sites.
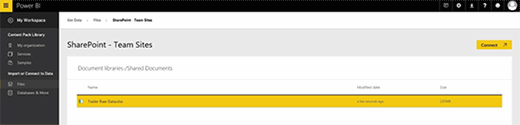
At this point, you can click on your document library, select the file that you want to analyze as shown in figure four, and then click Connect.
You can choose to import the data or connect to the data. Importing the data causes Power BI to connect to the document within the SharePoint document library. This allows you to create Power BI reports and dashboards; the data is automatically refreshed directly from SharePoint.
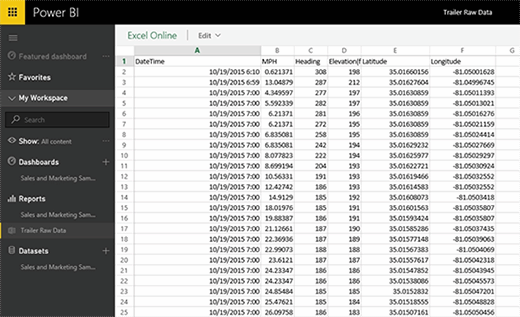
The alternative is to import the Excel workbook into Power BI. This approach will let you use Excel-level elements such as charts and pivot tables directly within Power BI, but will create two separate copies of the spreadsheet. If you need to keep the spreadsheet data up-to-date, you will have to use a scheduled refresh. In most cases, it is better to use the Refresh option unless you have a compelling reason to import a full-blown spreadsheet. Figure five shows a spreadsheet within Power BI.
Although it is preferable to import data rather than import an entire spreadsheet, the import function will work only if the spreadsheet is properly formatted. Otherwise, you will receive an error indicating that Power BI cannot locate any data within the Excel workbook.
Power BI requires that the first row of any imported spreadsheet contain column headers. You will notice in the previous figure that my spreadsheet has column headers. Although the header text exists, the text has not been designated as such. You have to format the data as a table for Power BI to recognize it. The exact method of doing this varies depending on the version of Excel that you are using. In Excel 2013 you can simply select your data, including the headers; click the Table button found on Excel's Insert tab; and select the My Table Has Headers check box that is displayed within the resulting dialog box. Microsoft provides a full set of instructions here.
It has become much easier to bring data that resides within a SharePoint team site into Power BI. Incidentally, the Power BI data can also be exported to SharePoint.